ATTENTION YOUTUBERS, BLOGGERS

ATTENTION YOUTUBERS AND BLOGGERS :
YOU ARE NOT ALLOWED TO COPY THE TUTORIALS FROM THIS BLOG AND PRODUCE THEM AS YOUR OWN WHETHER ON PRINT OR ELECTRONIC MEDIA OR SHOW THEM ON YOUR BLOGS OR YOUTUBE CHANNELS.YOU ARE ALLOWED TO SHOW THE FINISHED WORK BUT PLEASE LINK BACK TO THIS BLOG FOR THE TUTORIALS.IF FOUND COPYING, I WILL REPORT YOU TO YOUTUBE AND ADSENSE.

Monday, March 26, 2012

Barbara's peacock - Part 2


Today,  I’ll show you how I’m going to embroider the peacock’s wing.


The lowest part of the wing should be dark blue but since I don’t have that shade of blue, I’d used the same thread that I’d used for the body.For the rest of the wing, my choice was buttonhole-knot method.I made one straight stitch and worked buttonhole knots on it.This was done with 3 strands of stranded cotton.


Alternate between white and black.


One row completed.


And, the remaining rows.
Whenever I admire a peacock’s beauty, I used to wonder – “Why did God decide to create these black and white feathers?”I mean, they’re dull looking, boring and not shiny like the rest of the feathers.I even had to think twice before embroidering these.I guess, maybe it’s one way of God telling us – ‘Hey, nobody’s perfect!’

 To view completed project, please click here.

Saturday, March 17, 2012

Mirror work 4


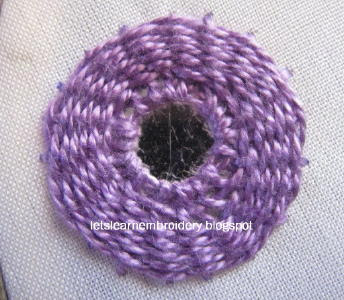
Sharon’s week 11 TAST challenge is whipped wheel stitch.Once again, I’m going to try this on mirror/shisha.The biggest challenge here is to stitch the spokes on the mirror.The rest should be easy.As promised, this is the tutorial for whipped wheel mirror work :

This mirrorwork is my own creation.You are not allowed to copy the tutorial and produce it as your own whether on print or electronic media, on your blog or youtube channels.You are allowed to show the finished work but please link back to this page for the tutorial.

The mirror that I’m using is 1.25m in diameter.Divide a 2.5cm diameter circle into 16.Attach the mirror as shown and bring up the needle at the shown position (below A).


Bring the needle and thread over and under the foundation stitches.Wrap the thread under the needle and pull (when pulling, use equal tension all around to produce beautiful, rounded center).


Enter the needle at B.Bring the needle up just next to the first stitch.


Continue as above and enter the needle at C.


Continue in the same manner till the end.The spokes are ready.It’s OK if it’s not perfect.What’s important are the spokes.Once you weave, everything else would be hidden behind the weaving.


I succeeded in finishing this whipped wheel mirror/shisha work.


This is the normal method of weaving by passing the thread over and under the spokes.For this, you’ll need odd-numbered spokes.

Tuesday, March 6, 2012

Barbara's peacock - Part 1


I’m a huge fan of Lakshmi’s peacock.She embroiders one of the most beautiful peacocks.So, when I saw peacock patterns on Barbara’s blog, I decided to embroider one of my own.She has 3 peacock patterns on her blog and if time permits, I would like to embroider all 3.I’ll give you the exact link for this peacock at the end of my project but my advice is – go and explore her blog.There’re lots of beautiful patterns to choose from.My favourites – women in flowing gowns, holding baskets, flowers…Oh, I love them all!Every week, I would save her pattern thinking that’s the most beautiful but the very next week, she would surprise me with a better pattern.So, I ended up saving ALL her patterns!


My peacock has begun to take shape.As you can see, I’d embroidered the head and crest.The white patch around the eye is not in the original pattern.I embroidered it to give the peacock a realistic look.For the head, satin stitch was used with 2 strands of silk thread.The crest is stem stitch – 2 strands of stranded cotton (2 strands from the 6-strand thread).


Blue beads were sewn on top of the crest.The body’s a combination of satin and long and short stitches, depending on the width.I’d made a few parallel stitches on the body.By doing this, I’ll know the ’flow’ of my thread – in which direction I should stitch.


By working the straight stitches here and there, I gradually filled up the spaces in between and completed the body of the peacock.In my next post, I’ll show you how to embroider the wings.


To view completed project, please click here.