ATTENTION YOUTUBERS, BLOGGERS

ATTENTION YOUTUBERS AND BLOGGERS :
YOU ARE NOT ALLOWED TO COPY THE TUTORIALS FROM THIS BLOG AND PRODUCE THEM AS YOUR OWN WHETHER ON PRINT OR ELECTRONIC MEDIA OR SHOW THEM ON YOUR BLOGS OR YOUTUBE CHANNELS.YOU ARE ALLOWED TO SHOW THE FINISHED WORK BUT PLEASE LINK BACK TO THIS BLOG FOR THE TUTORIALS.IF FOUND COPYING, I WILL REPORT YOU TO YOUTUBE AND ADSENSE.

Sunday, July 24, 2011

Underwater scene 2


After completing the plants, I couldn’t wait to embroider a starfish. I’ve decided to use buttonhole stitch (blanket stitch) for this, worked with Anchor pearl cotton no:8 thread.


Divide each arm of the starfish into 2 parts and work buttonhole stitch from the mid-point, cover the whole right side to the tip. Make a small stitch at the tip before continuing.


Continue from the tip; cover the left side back to the mid-point. Work other arms the same way. I was in a dilemma, whether to leave the starfish as it is, or…….


Work buttonhole knots all around it as in the frilled buttonhole-knot stitch. This is not bad, is it? It looks like the starfish is swimming.


To view completed pattern, please click here.

Underwater scene 1

To begin with, I would like to thank Lakshmi Sadalas for sending lots and lots of visitors to my blog. For the past one week, I had been drawing and erasing, drawing and erasing…… You see, I wanted to embroider an underwater scene and since I’m not good at drawing, it took me many days to prepare a pattern. I had never done underwater embroidery before, so I just hope that this would turn out fine. I got the inspiration for this from Shirley’s blog. She paints and embroiders magnificent underwater scenes. Firstly, I’m going to embroider underwater plants, using buttonhole-knot technique. The tutorial for the leaves is given here.


For this first plant, I’ve used six strands for the small stitches used to hold and shape the threads. As I progressed with my work, I realized that I didn’t have enough thread to complete the leaves. That’s why the buttonhole knots were done with a different-coloured thread. As a result, the thread at the base could be seen here and there. So, please use the same colour for the whole work.


These are the completed leaves.


For the next plant, the small stitches were done with 2 strands of thread, the buttonhole knots with 6 strands. I think this is better.


 In my next post, I’ll show you how to embroider a starfish.


To view completed pattern, please click here.


Saturday, July 16, 2011

Buttonhole-knot rosebud 5

Another rosebud? …..Unfortunately, yes!


Embroider a pointed buttonhole-knot petal from A to B. Enter the fabric at C. Embroider another petal from D to E. Enter at the same point, C.


Work 2 single buttonhole-knot stitches for calyx.


Complete the calyx with 2 more stitches at both sides and at the base of the bud. The straight stitch is for the stalk.

Buttonhole-knot rosebud 4

I hope you’re not tired of my rosebuds, because……..here comes another one!


Embroider a pointed buttonhole-knot petal and flank both sides with single buttonhole-knot petals. The thread on the right seems loose because I wanted to show the position of the stitch. When you’re embroidering, make sure that it is not loose.


Here, I’ve filled the stitch with buttonhole knots.


Embroider calyx as shown. Make 3 straight stitches; one for the stalk, the rest for….(What do you call them? Sepals?)

Monday, July 11, 2011

Buttonhole-knot rosebud 3

Shown below is another method of embroidering a rosebud, using the buttonhole-knot technique.


 Embroider 3 pointed buttonhole-knot petals, as shown. Click here for the tutorial.


With green thread, work single buttonhole knots on the 2 petals shown and at the base of the petal. Make a straight stitch for the stalk.


If you prefer, work 2 more single buttonhole-knot stitches at both sides of the rosebud to complete the calyx.

Friday, July 8, 2011

Side view rose

Today, you will learn on how to embroider a side-view rose.


Embroider a pointed buttonhole-knot petal. The tutorial for this is given here. Make a diagonal stitch at the base of the petal and work buttonhole knots on it. Make another stitch at the opposite direction, crisscrossing at the base.


Work buttonhole knots on this stitch, too.


In the same manner, work 2 more buttonhole-knot petals at the positions shown in the picture.


Work a larger petal below those petals.


This is the last petal. Embroider buttonhole-knot calyx at the base and the straight stitch is for the stalk.

Buttonhole-knot rosebud-2

This is another way of making a rosebud, using buttonhole-knot technique.


Embroider a pointed buttonhole-knot petal. The tutorial for this is given here. Make a diagonal stitch at the base of the petal and work buttonhole knots on it. Make another stitch at the opposite direction, crisscrossing at the base.


Work buttonhole knots on this stitch, too.


In the same manner, work 2 more buttonhole-knot petals at the positions shown in the picture.


With green thread, work buttonhole knots at the base of the petal for the calyx.


 Make a straight stitch for the stalk.

Wednesday, July 6, 2011

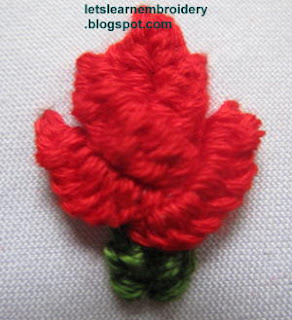
Buttonhole-knot rosebud


To make this rosebud, firstly, embroider a pointed buttonhole-knot petal. Please click here for the tutorial.
 Embroider a diagonal stitch at the base of the petal and work buttonhole knots on it. Make another stitch at the opposite direction, crisscrossing the first one at the base.


Work buttonhole knots on this stitch,too.


With green thread, work 2 buttonhole-knot stitches, facing opposite directions.


Embroider buttonhole knots at the base of the petal. This will complete the calyx. Make a straight stitch for the stalk.


Sunday, July 3, 2011

Buttonhole-knot leaf 2


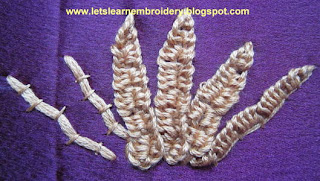
Today, I’m going to teach you on how to embroider long leaves using buttonhole-knot technique. For small leaves, please refer my tutorial here.


 You’ll have to make a few running stitches on the main vein of the leaf. By doing so, the leaf can be made straight or bending.


Insert 2 strands of thread from the base to the tip of the leaf. Make sure the threads didn’t twist.


With 1 strand of thread, work buttonhole knots on the thread on the left side, from base to tip. You will have to stop making the knots a few mm away from the tip and enter the fabric at the tip (to get pointed tip). Come back to the base and continue on the right side.


These leaves are really simple to embroider.

Spiral buttonhole-knot rose


I intended to make another flower using the buttonhole-knot method but ended up making a rose. So, here’s my latest rose creation-spiral buttonhole-knot rose.


Draw a circle. This is a 2cm diameter circle. Draw bigger circle for bigger flower. Starting from the center, draw a spiral line all the way to the top. Work running stitches (small stitches) on the spiral, as shown.


Bring the needle up at the center and insert the thread into the running stitches.


Beginning from the center, work buttonhole knots to cover the thread. I wish I had drawn a bigger circle. What I like about this rose, is that it is actually ‘blooming’ on the fabric.


This was my attempt with pearl cotton no:8 thread.  The previous one was done with the 6-strand embroidery floss.